Furnace
Aluminium has a relatively low melting point and being able to melt aluminium and make simple castings greatly extends the capability of a workshop. In addition, being able to melt and cast aluminium means that otherwise scrap materials can be put to good use.
A set up for casting aluminium is very cheap to make. The cost of the furnace and a burner is only about £10-15. A propane cylinder refill costs about £15 and this will melt melt a lot of metal.
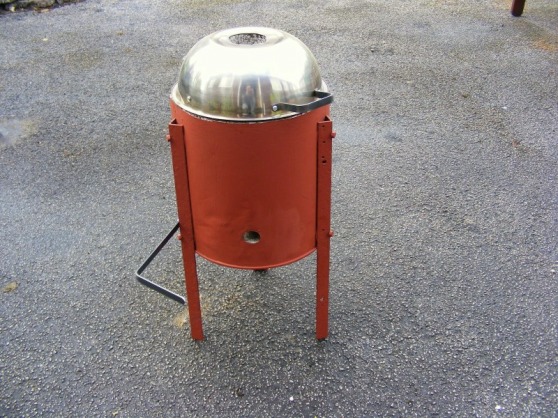
The furnace shown above was made from an old 25 litre metal drum that once contained bitumastic paint. The external diameter is 280 mm and the height is 290 mm (excluding the legs). The legs were made from 25 x 25 x 3 steel angle bolted to the drum. The 25 mm hole at the front is for the burner and the L shaped metal piece bolted to one of the legs is to support the burner. The lid is made from a cheap stainless steel bowl to which are attached some bent metal handles.
As well as being useful for melting aluminium, the furnace has also been used to heat treat and anneal large pieces of metal and for brazing large chunks of metal such as the two parts of my ER32 collet chuck.
A set up for casting aluminium is very cheap to make. The cost of the furnace and a burner is only about £10-15. A propane cylinder refill costs about £15 and this will melt melt a lot of metal.
The furnace shown above was made from an old 25 litre metal drum that once contained bitumastic paint. The external diameter is 280 mm and the height is 290 mm (excluding the legs). The legs were made from 25 x 25 x 3 steel angle bolted to the drum. The 25 mm hole at the front is for the burner and the L shaped metal piece bolted to one of the legs is to support the burner. The lid is made from a cheap stainless steel bowl to which are attached some bent metal handles.
As well as being useful for melting aluminium, the furnace has also been used to heat treat and anneal large pieces of metal and for brazing large chunks of metal such as the two parts of my ER32 collet chuck.
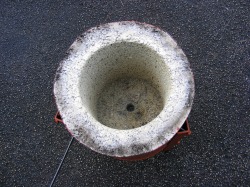
The inside of the furnace is lined with a refractory cement. The inside diameter of the furnace is 180 mm. The 15 mm hole in the bottom is a drain hole so that if a crucible fails the furnace does not fill up with molten aluminium. In use this is covered by a refractory brick on which the crucible stands. The top of the furnace must be finished flat so that when the lid is in position there is a reasonably good fit with no gap.
The refractory cement was a home made mixture consisting of the following ingredients:
1. Portland cement - 1 part by volume
2. Clay - 1 part by volume. I used clay based cat litter. This is available from most supermarkets
3. Perlite - 7 parts by volume. Perlite is an expanded ceramic material that is used by some gardeners in potting soils because it is lightweight and provides an open structure. Perlite is available from garden centres and Wilkinsons. It is a very good insulator.
The mixing of these ingredients must be done in the right order in order to obtain a uniform mix. First the clay (cat litter) was measured out and this was mixed with some water to obtain a slurry with the consistency of double cream. The portland cement was added and the mix was tempered with more water to restore it to the creamy condition. The perlite was added in small portions to this mix with constant stirring and additions of water to keep the mix workable until all the perlite was incorporated. The mix should be stiff and each grain of perlite coated with the clay cement slurry.
The drum was prepared by cutting the top off and then reducing the height to 290 mm. The two holes, one in the base and one in the side were then cut using a holesaw. The hole in the side was about 60 mm above the base of the drum. The legs were then attached with screws and nuts. A short plastic tube is inserted in the hole in the bottom so that 50 mm protrudes into the drum. The former for the cavity was then prepared. This was an old 5 litre plastic paint container 180 mm in diameter. This was filled with rammed damp earth. A short piece of 25 mm diameter pipe was prepared by shaping one end so that when it was pushed through the side hole it met the former tangentially. A layer of the refractory was then spread on the bottom of the drum and rammed into place. This layer is built up to a thickness of 50 mm. The former for the cavity was placed centrally inside the drum and a little refractory mix rammed down around the side hole. The prepared 25 mm pipe was then inserted and angled tangentially to the drum.The cavity between the former and the drum was then filled with the refractory mix in layers ramming down each layer until it reached to the top of the drum. It was levelled off flush with the top of the drum. The drum was then left for a day for the refractory to cure. The next day the side and bottom pipes were withdrawn and the rammed earth in the former dug out. The plastic former was slit from top to bottom using a sharp craft knife in several places and then withdrawn. Care is necessary in all these operations because at this stage the refractory is fairly fragile.
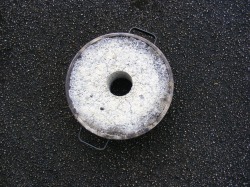
The lid is made using the same principles. The bowl was prepared by cutting a 60 mm hole with, a holesaw, in the centre. Two handles were made from hot rolled steel strip and bolted on the sides using 50 mm bolts. The bolts protrude on the inside of the bowl. Some stiff (circa 2.5 mm) wire was then wired from the protruding screws around the inside of the bowl keeping it about 20-25 mm from the inside wall. This wire is to reinforce the refractory and prevent it dropping out of the bowl. A plastic bottle approx 60 mm diameter was used as a former for the central hole. This was placed centrally in the bowl and refractory rammed into the bowl and levelled off with the rim. The lid was left to cure for a day and then the central former was removed.
The furnace and lid must now be left to dry out thoroughly for 2 weeks. In the latter stages of the drying process I put a 100 watt light bulb inside the furnace with the lid on to speed up the drying process. After drying the furnace lining should be a light greyish white colour.
When drying is complete the furnace can be fired. The burner was inserted in the burner hole and lit with a small flame and left for 1/2 hour. The burner flame can then be increased gradually over a 2 hour period until it is running at maximum. During this time steam can be seen escaping around the edge of the metal drum. If the amount of steam being released becomes very noticeable then turn down the burner for a while. The idea here is to dry the remaining water from the material slowly but uniformly. Heating too fast may result in a cracked liner.
After making the furnace and lid any surplus refractory can be used to make crucible platforms. These should be 75-100 mm diameter pieces about 25 mm thick. Round plastic tubs used for foodstuffs such as margarine, coleslaw etc. make excellent moulds for this purpose.
After firing the furnace lining should have a creamy white colour.
The furnace was given a coat of red oxide primer to finish it off.
The furnace is easily lifted ( circa 15 kg) and is easy to transport and move around. The cavity will easily accomodate a large crucible containing more than 1 litre of molten aluminium ( 3-4 kg of aluminium).
The furnace described here is my second furnace. It is about 1 year old and it has been used many times and is showing little signs of any deterioration. In use the outside becomes warm but not hot. The paint on the furnace shows no sign of deterioration even after much use. My previous furnace was much smaller and was in use for about 3 years. It has been fired about 50 times and it is still quite useable.
