Hot wire cutter
Most casting that I do is done using the lost foam technique rather than the more conventional wooden pattern and greensand method. The reasons for this are as follows:
1. Preparing a wooden pattern is very time consuming. It is necessary to machine and sand the pattern making sure all surfaces have sufficient draft angle in order to permit withdrawal from the mould. The pattern must then be filled, sanded, sealed and painted. The time invested is considerable and spread out over many days and this does not fit well with my impatient temperament.
2. A lost foam pattern for even quite a complex part can be prepared in a few hours and a simple pattern often in a few minutes.
3. There is no need to worry about draft angles on a foam pattern. In fact almost anything that can be modelled in foam can be cast.
4. Only loose fine sand is needed as the casting medium for the lost foam method. For conventional casting the sand clay mix must be prepared and mulled to the correct consistency.
5. The advantage of wooden patterns is that they can be reused more or less indefinitely so that many identical parts can be produced. However, usually I only need one part and the fact that the pattern is destroyed in the process is of little consequence.
Lost foam patterns are modelled from expanded polystyrene foam. The foam can be cut and shaped using a variety of methods including, cutting with a craft knife, sawing, sanding etc. However. the easiest, simplest and most accurate method is to use a hot wire cutter. A hot wire cutter enables blocks to be cut, and also enables circular forms to be readily produced. With blocks and cylindrical shapes most patterns can be built up.
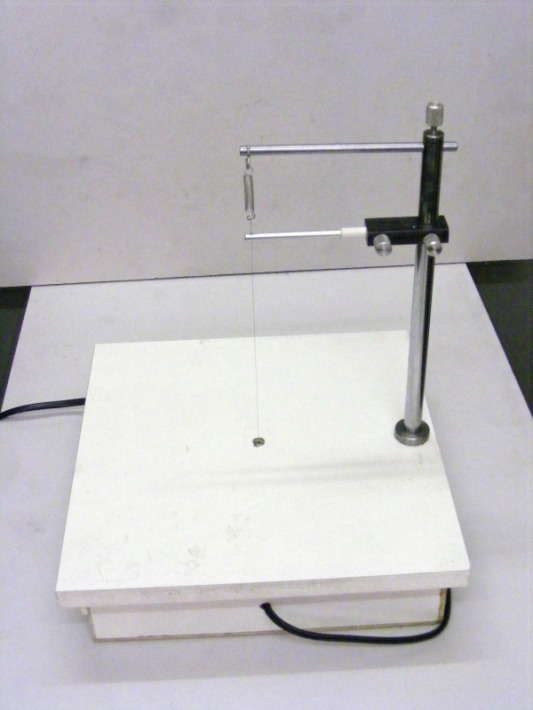
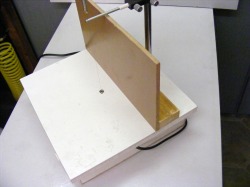
The hot wire cutter described here was made very quickly form scrap material. The header photo shows most of the important features. It consists of a flat table, mine is about 300 mm square, on which is mounted a pillar carrying two arms. The upper arm carries a tension spring for the wire and the lower arm is simply a guide to keep the wire straight. The lower arm is insulated from the pillar by a plastic collar. The table sits on a small box containing the power supply. The edges of the table overlap the sides of the box so that fences etc can be clamped to the edge of the table. The wire is 36 swg nicrome wire and it is clamped to a metal block inset into the table.
1. Preparing a wooden pattern is very time consuming. It is necessary to machine and sand the pattern making sure all surfaces have sufficient draft angle in order to permit withdrawal from the mould. The pattern must then be filled, sanded, sealed and painted. The time invested is considerable and spread out over many days and this does not fit well with my impatient temperament.
2. A lost foam pattern for even quite a complex part can be prepared in a few hours and a simple pattern often in a few minutes.
3. There is no need to worry about draft angles on a foam pattern. In fact almost anything that can be modelled in foam can be cast.
4. Only loose fine sand is needed as the casting medium for the lost foam method. For conventional casting the sand clay mix must be prepared and mulled to the correct consistency.
5. The advantage of wooden patterns is that they can be reused more or less indefinitely so that many identical parts can be produced. However, usually I only need one part and the fact that the pattern is destroyed in the process is of little consequence.
Lost foam patterns are modelled from expanded polystyrene foam. The foam can be cut and shaped using a variety of methods including, cutting with a craft knife, sawing, sanding etc. However. the easiest, simplest and most accurate method is to use a hot wire cutter. A hot wire cutter enables blocks to be cut, and also enables circular forms to be readily produced. With blocks and cylindrical shapes most patterns can be built up.
The hot wire cutter described here was made very quickly form scrap material. The header photo shows most of the important features. It consists of a flat table, mine is about 300 mm square, on which is mounted a pillar carrying two arms. The upper arm carries a tension spring for the wire and the lower arm is simply a guide to keep the wire straight. The lower arm is insulated from the pillar by a plastic collar. The table sits on a small box containing the power supply. The edges of the table overlap the sides of the box so that fences etc can be clamped to the edge of the table. The wire is 36 swg nicrome wire and it is clamped to a metal block inset into the table.

The diagram above shows the electrical circuit. Mains power enters at the right hand side through an on/off switch. The mains neon (with internal resistor rated for 240V working) indicates when the unit is turned on. The supply then passes through a solid state lamp dimmer to the primary of the 12 volt transformer. The transformer secondary is connected directly accross the hot wire. Construction of the power supply involves AC mains wiring. Care should be taken to ensure that safe practices are followed. If in doubt consult a qualified electrician.
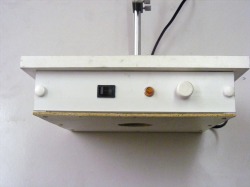
This shows the front panel of the unit. The switch on the left can be used to interrupt the power to the hot wire instantly. In the centre is a light to indicate when the unit is switched on. On the right is the lamp dimmer control knob
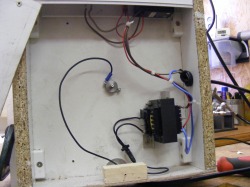
The box contains the transformer (lower right). In the centre is the nichrome wire clamp with electrical connection. The other connection from the transformer output goes to the pillar.
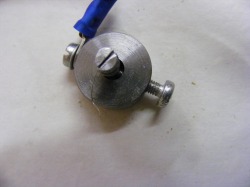
The clamp for the nicrome wire is a push fit into the table. The wire passes through a split aluminium rod and the clamp screw, on the left hand side, squeezes this around the wire both securing it and making the electrical connection.

This shows the underside of the unit. The central hole provides access for changing the wire if it breaks.
The fence is a piece of MDF screwed to a block of wood. This can be clamped to the table to enable blocks and sheets to be sliced from a large block of polystyrene.
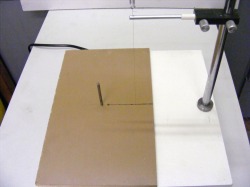
This arrangement is used to make circular cuts. It is a pece of MDF with a central spike around which a block of polystyrene can be rotated. The MDF is slit, as shown, to allow the wire to approach the spike. Once spike is correctly positioned then it is clamped in place
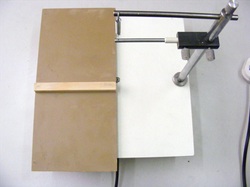
Another useful accessory is this sliding square. This enables accurate square cuts to be made. The sliding table is made from mdf. A strip of wood on the underside of the left hand edge acts as a guide that is held against the edge of the hot wire cutter table during cutting. The material to be cut is held against the horizontal strip of wood on the top of the table.
To make angled cuts suitably angled pieces of mdf can be placed against the strip on the top of the table.
To make angled cuts suitably angled pieces of mdf can be placed against the strip on the top of the table.
On the page entitled "Preparing a lost foam pattern" the hot wire cutter is shown in use preparing parts that will be assembled into a pattern.
