Lathe bed extension
This project was started because one day I needed to centre drill a round bar that was too large to fit in the bore of the lathe spindle and a little too long between the chuck and the drill in the tailstock to fit on the lathe. I did manage to centre the piece using a cut down centre drill almost buried in the tailstock chuck. The left hand movement of the carriage is limited by the position of the lead screw pillow block. It occured to me that if the pillow block were mounted on a bracket at the end of the lathe bed then I could gain 40 mm extra movement of the carriage. I checked the other end of the lead screw to see if there was enough screw thread to allow the lead screw to be moved along and found that there was plenty of unused lead screw hidden behind the electronics cover. Based on this the project seemed perfectly feasible and I began to design a bracket for the lathe end. Half way through this design work I had a second thought. If I was making a bracket for the pillow block why not design the bracket in such a way that I could use it as a rest to slide the tailstock onto when it was not being used. I made some sketches of such a bracket and in the end I decided that the easiest approach would be to make a bracket that would bolt to the end of the bed and actually form an extension to the bed.
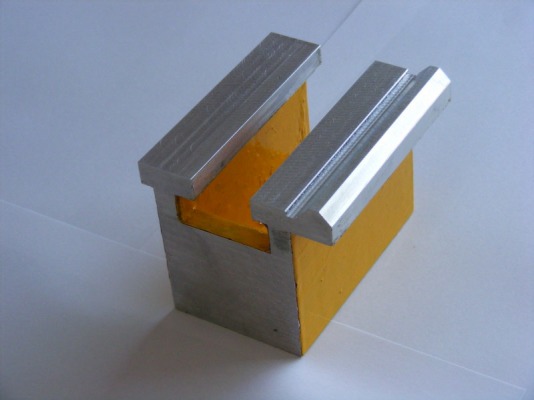
The photo above shows the result. The extension is 100 mm long and was cast in aluminium (see foundry pages). First a pattern was made using cut blocks of polystyrene which were glued together to form the basic shape. Sprues were attached to the pattern and it was buried in loose sand and then vibrated to ensure all the cavities were filled. The aluminium was melted and poured in a fast steady stream into the sprue. The resulting casting turned out really well. After cutting off the sprues, the bottom and front face were milled square to each other. The top was then milled flat and parallel to the base, except for the triangular bed way. The critical part was tackled next by milling the edges of the top to achieve the correct width of the bed and the correct width and position of the gap between the bed ways. Finally the truncated triangular bed way was milled using a 90 degree countersink as a milling cutter.
The photo above shows the result. The extension is 100 mm long and was cast in aluminium (see foundry pages). First a pattern was made using cut blocks of polystyrene which were glued together to form the basic shape. Sprues were attached to the pattern and it was buried in loose sand and then vibrated to ensure all the cavities were filled. The aluminium was melted and poured in a fast steady stream into the sprue. The resulting casting turned out really well. After cutting off the sprues, the bottom and front face were milled square to each other. The top was then milled flat and parallel to the base, except for the triangular bed way. The critical part was tackled next by milling the edges of the top to achieve the correct width of the bed and the correct width and position of the gap between the bed ways. Finally the truncated triangular bed way was milled using a 90 degree countersink as a milling cutter.
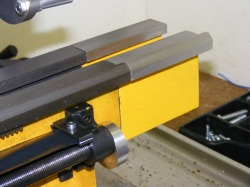
This shows the bed extension attached to the lathe. It is attached by a single M6 hex head screw through the front face into a tapped hole in the end of the lathe. Unfortunately the end of the lathe is not square so two M4 jacking screws were added to the front face so that the extension could be levelled and be co-planar with the main lathe bed. The extension was levelled by using the tailstock to clamp the two parts together and then adjusting the jacking screws. This fixing seems to be solid and secure.
The tailstock rides smoothly over the join although there is a click when it hits the join.
The tailstock rides smoothly over the join although there is a click when it hits the join.
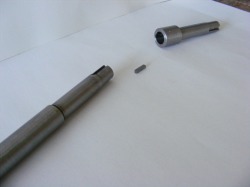
This photo shows the lead screw, key and a lead screw extension. The extension is machined to fit the left hand pillow block and keyed to accept the lead screw.
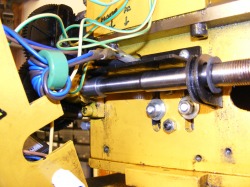
This shows the lead screw extension located in the left hand pillow block with the lead screw inserted in the extension.
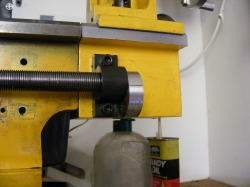
The right hand pillow block mounted on the lathe bed extension. The position of the pillow block was determined by moving the carriage to the right hand end of the bed and then closing the half nuts on the lead screw. The hole positions were then transferred to the bed extension with a transfer punch.
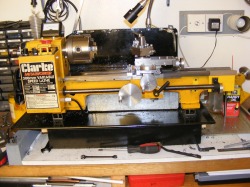
This shows the lathe after adding the bed extension and moving the leadscrew to the right.
This modification makes the lathe seem much longer and it increases the carriage travel right to the end of the original bed. The extension is an ideal place for parking the tailstock. With the tailstock sitting on the extension it can be used for light drilling operations on long work pieces.
