Rotary broaching on the mill.
On a previous page I described a method for rotary broaching in the lathe. This method used very simple equipment to produce shaped holes (e.g. hexagons) in a rotating workpiece. The device was designed in such a way it could be used to make the polygonal cutter required for the broaching operation.
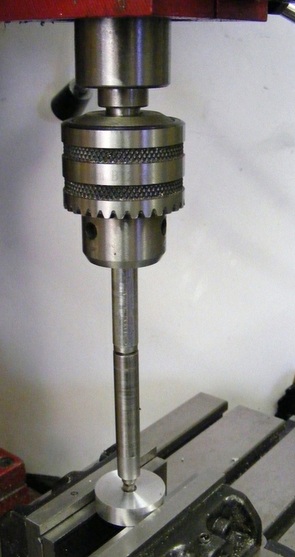
On this page I will describe a method for rotary broaching on the mill. This method is extremely simple. The photo above shows the set up for rotary broaching. At the bottom is the workpiece gripped in the vice on the milling table. The work piece has been drilled out with a 5 mm hole and this has been countersunk slightly using a 60 degree centre drill. Next up from the workpiece is the cutter. This is a piece of 10 mm silver steel (drill rod) that has been shaped at one end to a 5 mm AF hexagon shape and centre drilled at the other to form a 60 degree conical hole. The process for making this cutter is described on the "rotary broaching in the lathe" page (link above). Mounted in the drill chuck is a short length of steel bar. The end of the bar facing the cutter is also centre drilled, like the cutter, but the conical hole is off centre slightly so that the cutter is inclined at an angle of about 1 degree to the axis of the hole in the workpiece. Between the conical holes in the cutter and the bar is a 6mm steel ball. The ball and holes are well lubricated with grease. When the mill is turned on the upper end of the cutter precesses describing a cone with a half ange of 1 degree. When pressure is applied to the set up each edge of the hexagon end of the cutter is pressed in turn into the workpiece and it slowly sinks into the workpiece cutting a hexagon hole.
On this page I will describe a method for rotary broaching on the mill. This method is extremely simple. The photo above shows the set up for rotary broaching. At the bottom is the workpiece gripped in the vice on the milling table. The work piece has been drilled out with a 5 mm hole and this has been countersunk slightly using a 60 degree centre drill. Next up from the workpiece is the cutter. This is a piece of 10 mm silver steel (drill rod) that has been shaped at one end to a 5 mm AF hexagon shape and centre drilled at the other to form a 60 degree conical hole. The process for making this cutter is described on the "rotary broaching in the lathe" page (link above). Mounted in the drill chuck is a short length of steel bar. The end of the bar facing the cutter is also centre drilled, like the cutter, but the conical hole is off centre slightly so that the cutter is inclined at an angle of about 1 degree to the axis of the hole in the workpiece. Between the conical holes in the cutter and the bar is a 6mm steel ball. The ball and holes are well lubricated with grease. When the mill is turned on the upper end of the cutter precesses describing a cone with a half ange of 1 degree. When pressure is applied to the set up each edge of the hexagon end of the cutter is pressed in turn into the workpiece and it slowly sinks into the workpiece cutting a hexagon hole.
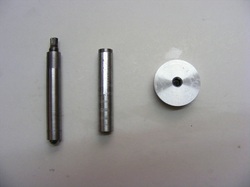
This shows the cutter, the bar with the offset conical hole and the workpiece.
The cutter is about 70 mm long.
The cutter is about 70 mm long.
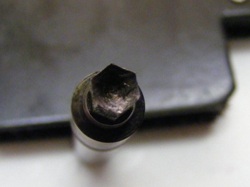
One end of the cutter is hexagon shaped. The distance across the flats is 5 mm. The sides of the cutter have a 2 degree angle to the axis to provide clearance.
The cutter was made from 10 mm silver steel using the device shown in the "rotary broaching in the lathe" page (link above). It was hardened and tempered before use.
The cutter was made from 10 mm silver steel using the device shown in the "rotary broaching in the lathe" page (link above). It was hardened and tempered before use.
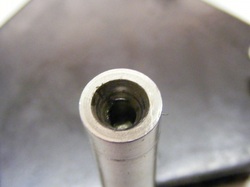
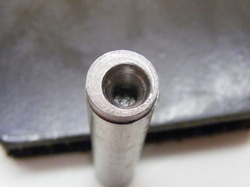
The other end of the cutter is centre drilled to form a 60 degree conical cavity that is concentric with the cutter.
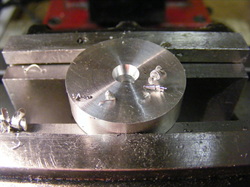
The bar with the offset conical hole is shown here. The cavity is offset by 1.25 mm from the centre of the bar.
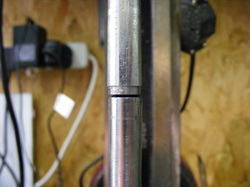
A 6 mm steel ball fits between the cutter cavity and the bar with the offset cavity. There must be a gap between the two parts when the ball is in place, as shown here, to allow the cutter to precess freely when the upper rod is turning. Note the rotating mill spindle merely imparts a wobble motion to the top of the cutter. The cutter does not rotate.
This shows the workpiece prepared for broaching. A 5 mm hole has been drilled through and then countersunk slightly with a centre drill. The outer diameter of the hole should be just larger than the across the points diameter of the hexagonal cutter.
The upper bar is held in the spindle, offset hole downwards. The 6 mm ball is placed in the cavity at the top of the cutter, which is then pushed up into the offset hole in the upper bar. Using the Z axis, the cutter is brought to bear lightly onto the conical lead in on the workpiece, with the ball sandwiched between the two conical holes.The workpiece/cutter area and the ball/cavity areas must be well lubricated.
The mill is then started at a few hundred rpm and a steady pressure applied to the assembly. The cutter slowly sinks into the workpiece.
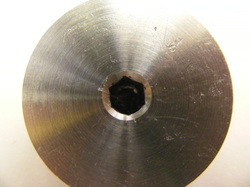
This shows the resulting broached hexagonal hole. This is about 8 mm deep.
This method of rotary broaching is extremely simple and requires no precision equipment. It works on the mill, as shown above.
It should also work on the lathe if a simple ball centre tailstock offset is made to support the back end of the cutter at about 1 degree from the lathe axis.
It should also work on the lathe if a simple ball centre tailstock offset is made to support the back end of the cutter at about 1 degree from the lathe axis.
